Tips for setting up remote lessons
Lessons learned from lockdown math
Many schools around the world are still planning to run their classes and lectures remotely this fall, or at least to operate under a mix of distance and in-person classes. So all the usual balls that teachers and professors need to juggle, keeping students engaged, being responsive to their misconceptions, hitting all the points of a dense lesson plan, etc., are now supposed to be handled with all the awkwardness and impersonality of a video call.
No one seems to have phrased it this way, but effectively this year the world's teachers were asked to become live streamers.
A few weeks ago I collaborated with two friends to do an experimental set of 10 live-streamed math lectures. Since then a number of teachers and professors have reached out asking about the setup I used, whether the live quizzing software made for those streams is available to others (it is!), and for general thoughts on the whole distance learning process, so I wanted to share my answer in one place.
Despite technically being a professional YouTuber, I certainly didn't know what I was doing when I jumped into this. The first time I downloaded the broadcasting software to see what it was all about, I accidentally streamed myself publicly for 3 seconds. For any educators out there who feel as unaware of this stuff as I was, this is for you.
There's actually a silver lining to every teacher suddenly being thrust into the role of a streamer. To the extent that your institution is comfortable with you recording and uploading your lessons publicly (which if you can, you should absolutely do), this year may end up providing the greatest influx of educational material to the internet that the world has ever seen.
If instead of thinking of remote classes as a more awkward form of a normal class, you view it as chance to practice video creation and turning your lessons into something more lasting and sharable, the benefit of handling this transition well may extend well beyond the education of this year's students.
Software
OBS
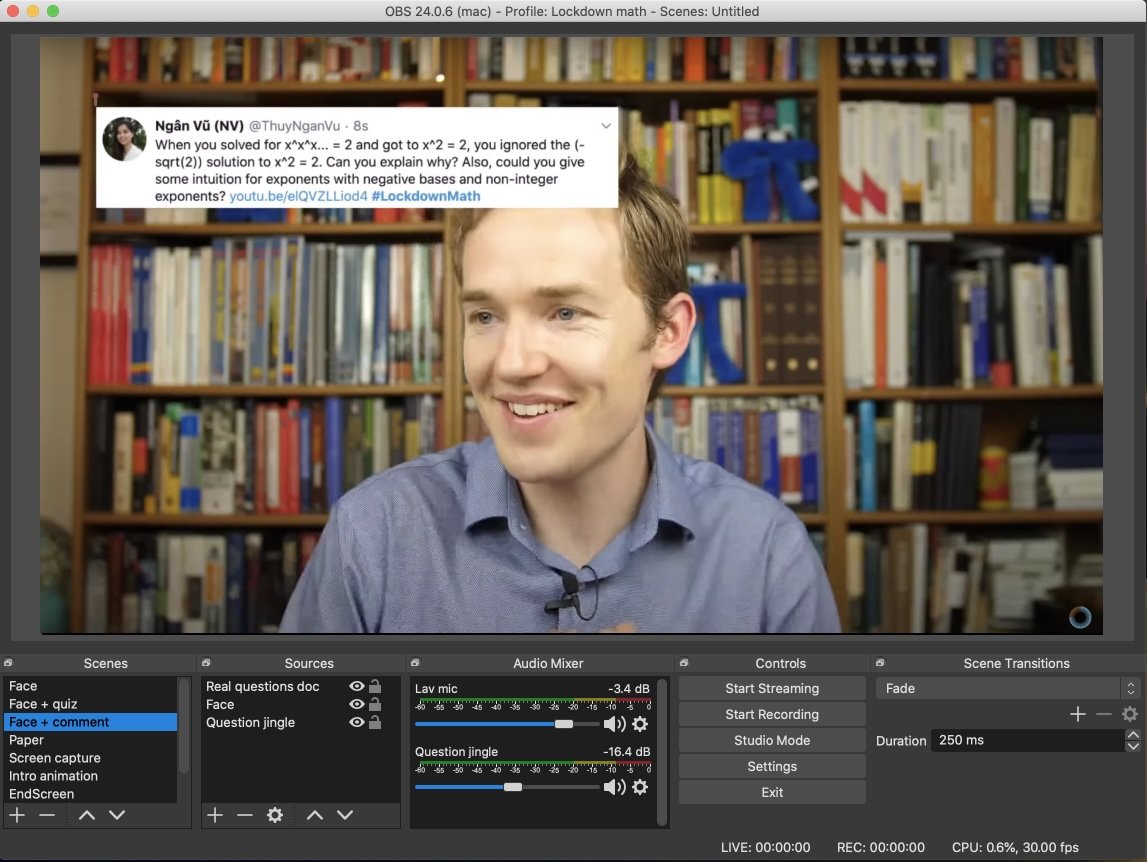
Most of the heavy lifting for live streaming is handled by a free broadcasting software called OBS. There are other options, but this is a popular choice, and it's what I used. It lets you organize various input sources, for example, cameras, microphones, or screen captures, and mix and match them to make various scenes. It's very seamless to use with YouTube or Twitch, but you can also connect OBS to Zoom, which is probably more relevant to most teachers.
For example, in my lessons, I set up 5 basic scenes:
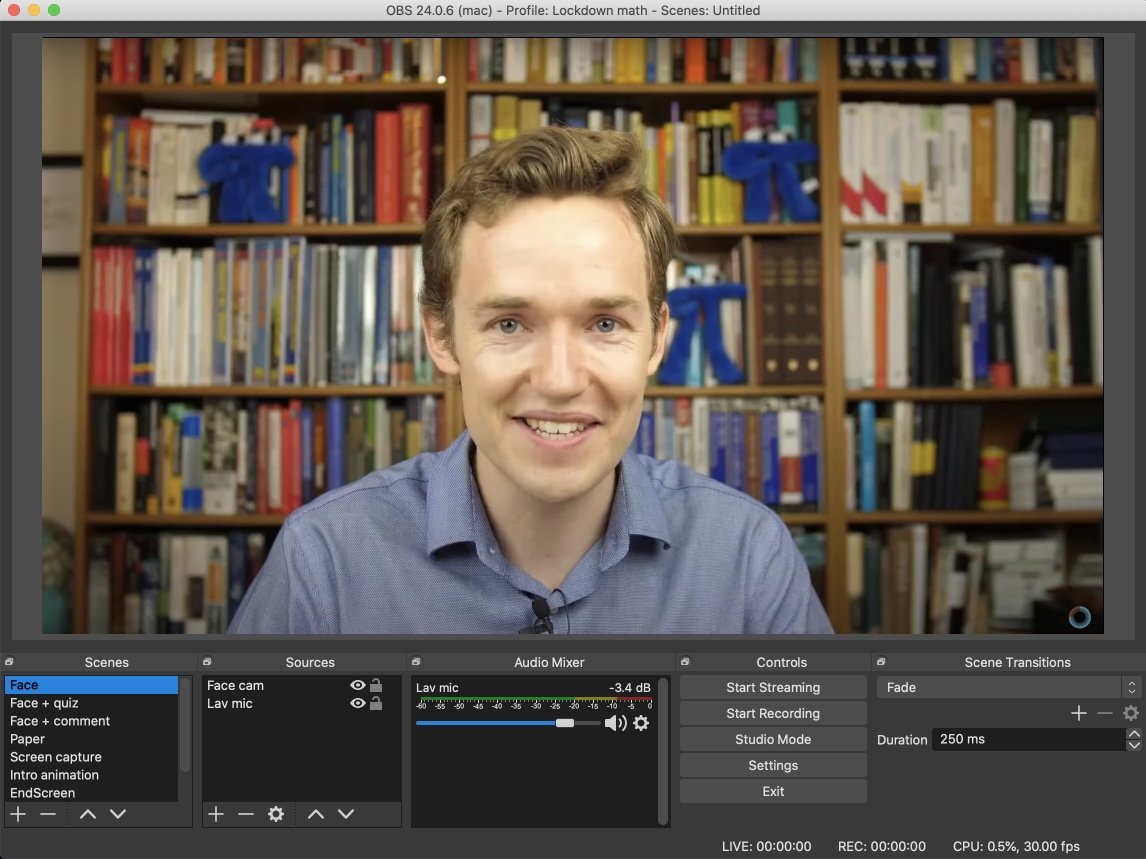
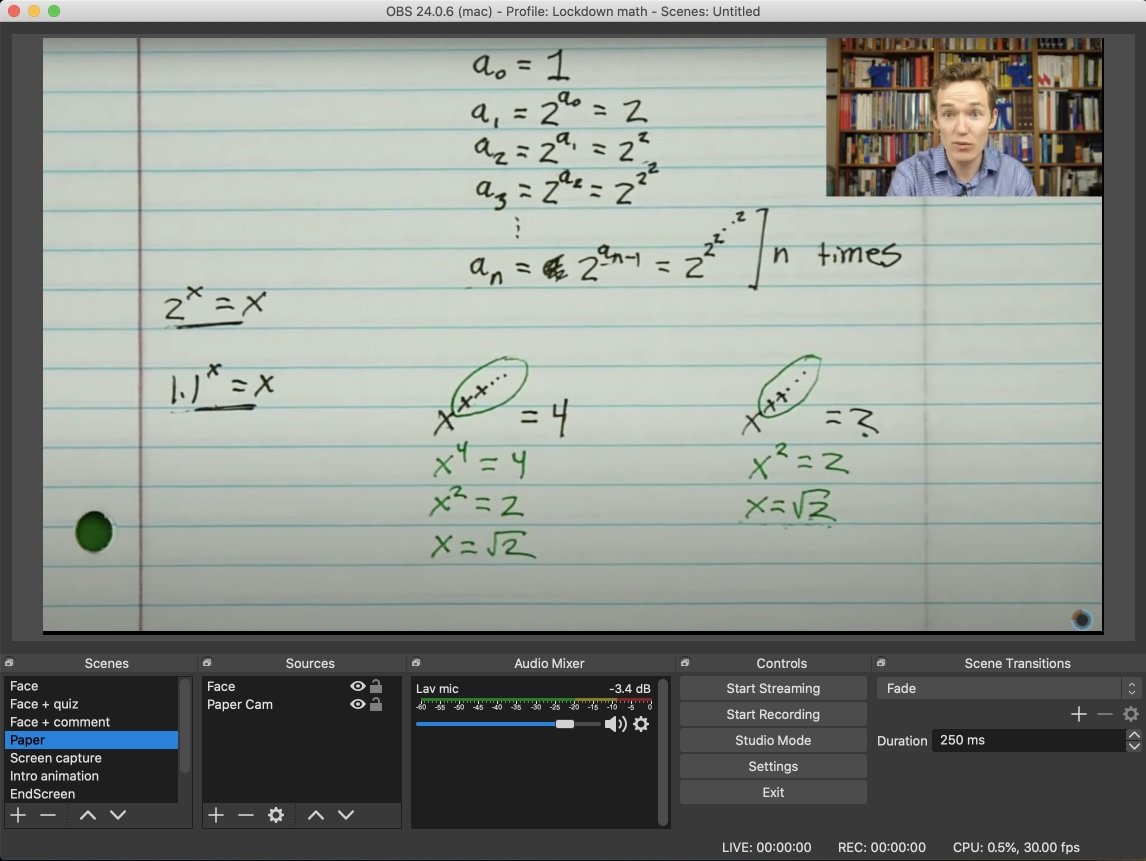
An overhead shot of pen and paper where I wrote out the lesson.
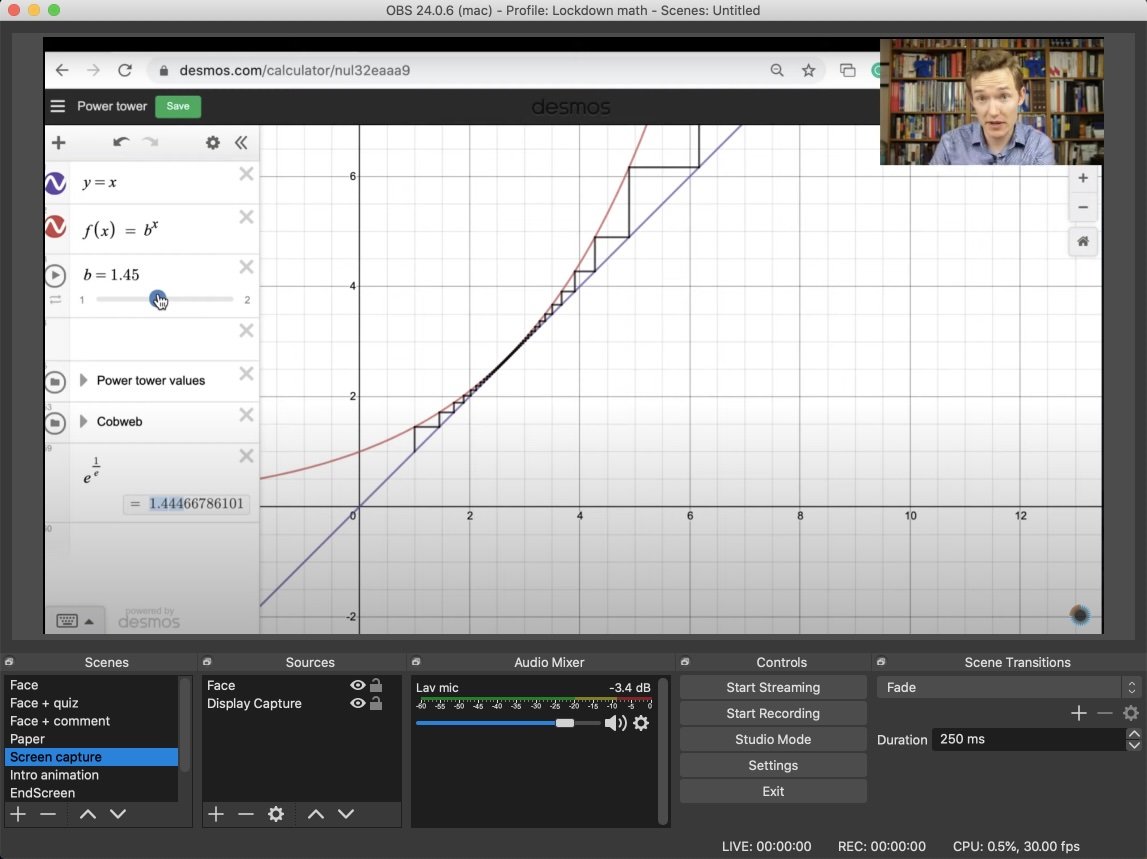
A screen capture used to show animations, graphs on Desmos, and coding examples
In OBS you can set up keyboard shortcuts, so I set up a few to associate certain keys under the lefthand of my keyboard with different scenes so that I could switch between them easily, potentially even while writing or gesturing with my right hand under the overhead camera. It may not have been quite as seamless as real live TV with a production team orchestrating the feed, but I think it can get arbitrarily close with practice. The upshot is that the look and feel of a professional production is more accessible to an individual teacher than you might think.
Itempool
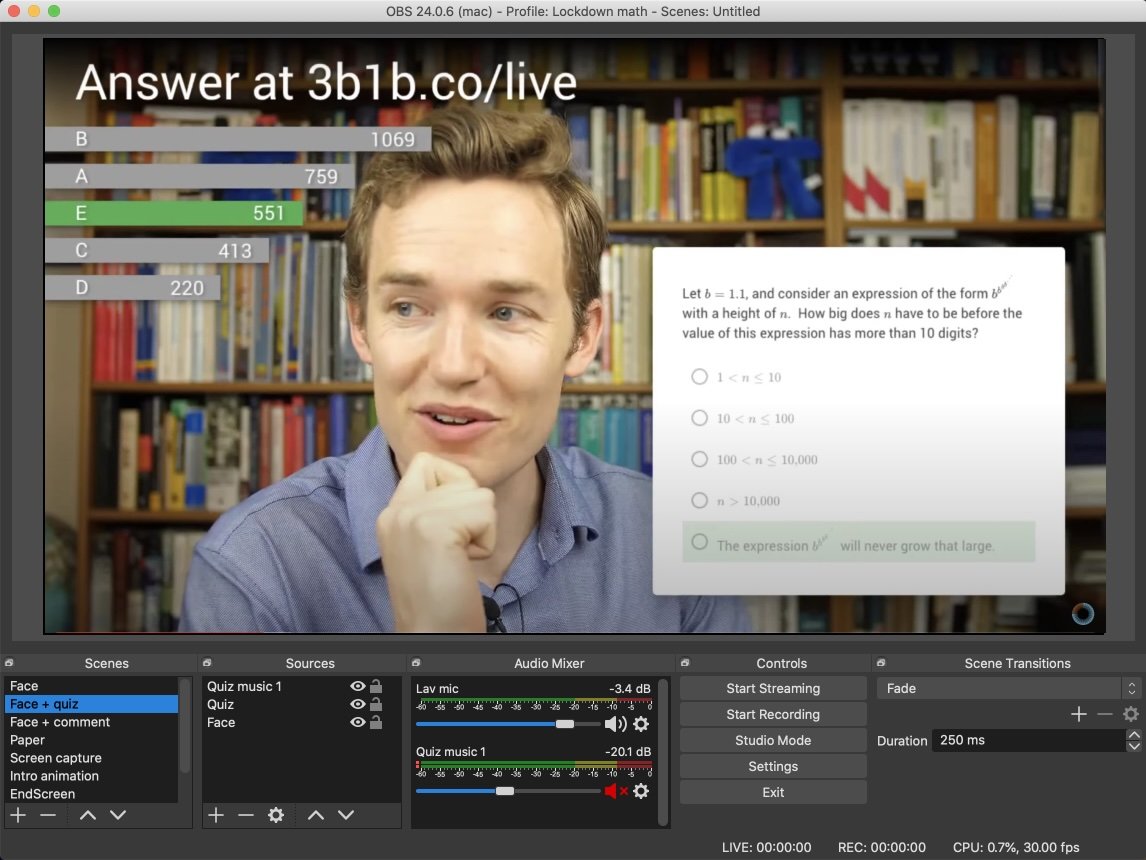
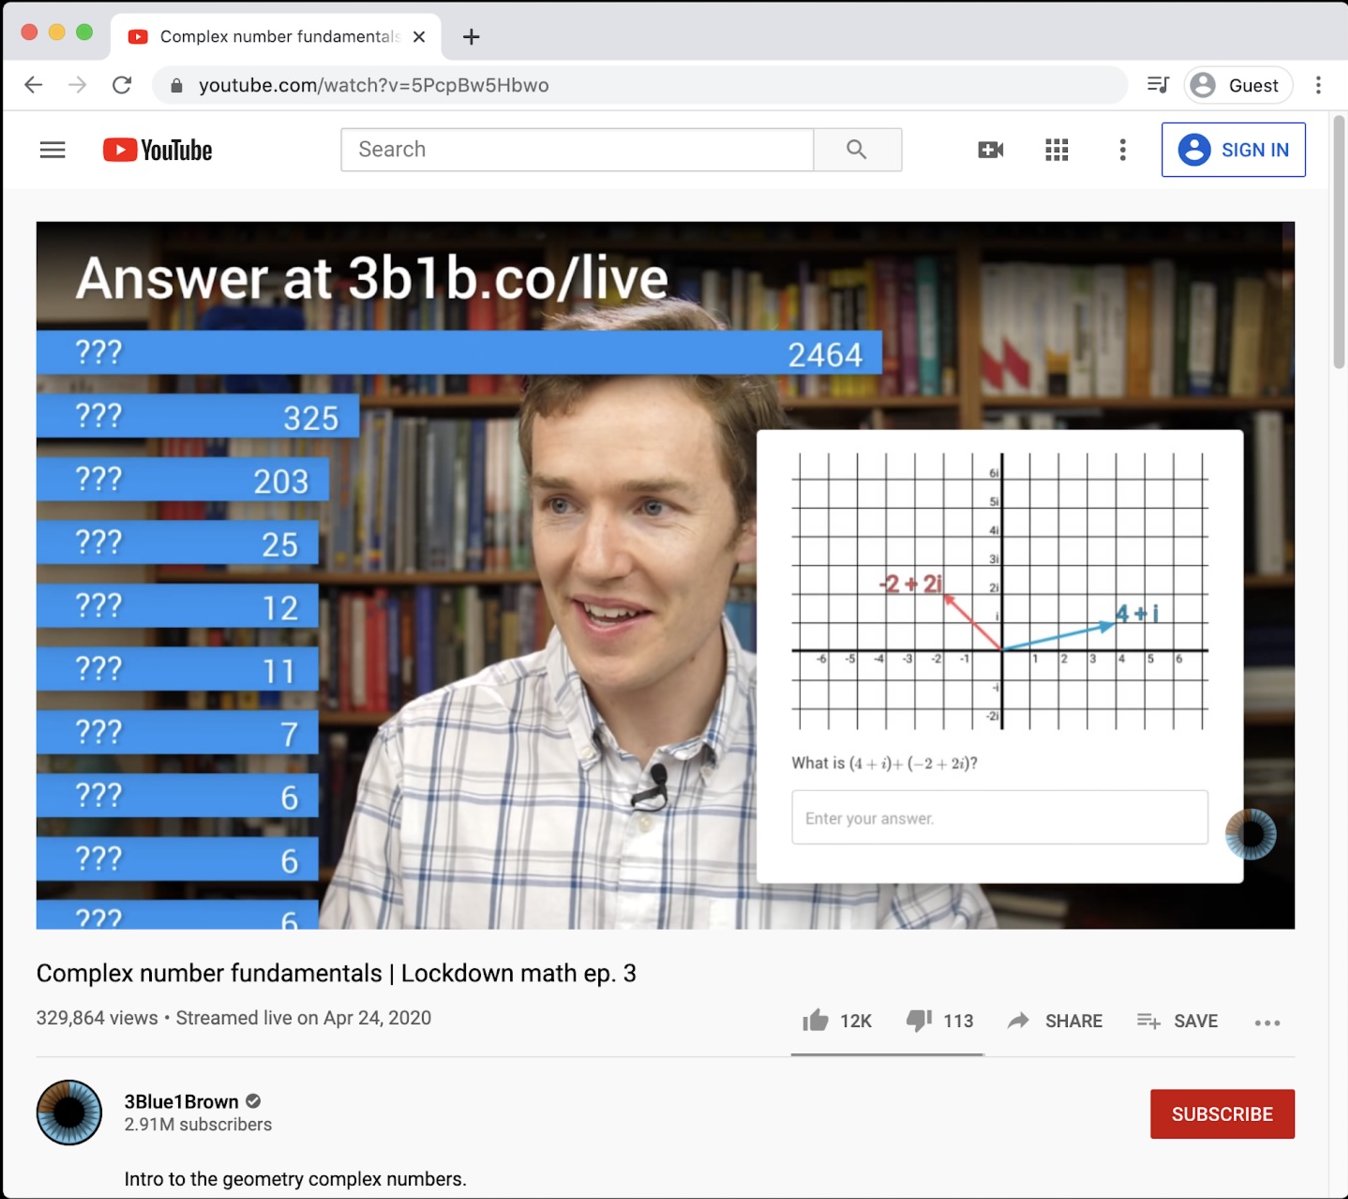
The tool used for the live quiz is part of Itempool, put together by two former coworkers of mine from Khan Academy. The way it worked is that I'd queue up a question on the screen, and students could go to a certain link (e.g. from their phones) to follow along with the quiz and answer questions. The statistics of how everyone was answering would show up in real time on the stream, where viewers would see bars showing the relative proportions for each answer. But until I flipped a switch to reveal, it was a mystery which answers corresponded to which bars.
To get the bars overlaid on the stream, we set up a webpage that displays the real-time updated bars and a title on a transparent background. That way, making that webpage an input source to OBS and creating a scene that combines the face camera with that page gave the effect we wanted.
At the time, it was a very bespoke tool just for that series, but now things have been set up so that you too can create questions, and turn any set of questions you write into one of these live challenges by clicking "administer live". This sets up the link where you can send students as well as the link to the page you can overlay on the stream. Also, and I'll admit I'm biased because it was built by friends, the act of actually writing math questions on Itempool is a delight, especially given the integration with MathLive.
When you're in a room alone talking to a camera, it's hard to overstate how nice it is to see some connection with the fact that there are really students there, in that moment, interacting with what you're providing them. Not to mention the value of seeing when there's a misconception, and for the students to see that many others had the same misconception.
Desmos and Geogebra
I expect many math teachers already know about Desmos. It's an online graphing calculator that makes it very simple to whip up surprisingly complicated graphs. I found it abundantly useful for live presentations over a stream, and what's nice is that you can share the links of what you build so that students can play with them. For example, here is a cobweb diagram I put together for the lesson on power towers. Beyond the graphing calculator, they also have an abundance of classroom activities.
One other very powerful tool for making interactive demos that I made use of was Geogebra. For example, here is the "complex slide rule" that came up during the lecture on complex number fundamentals.
One potential benefit of classes becoming remote is how much more natural it becomes to use the best tools for interacting with math that the internet has to offer. Sure, in principle there's no reason that these tools couldn't also be used for in-person teaching, but shifting to a setting that is necessarily online already lowers the activation energy to make it happen.
Hardware
As far as the physical setup goes, let me start by saying most teachers don't have to be too fancy about this. A simple webcam will do, along with whatever mechanism suits you best to show what you're writing, whether that's a tablet, an overhead camera, or a whiteboard behind you. What matters most is the lesson itself and your charismatic presence. To goal of any recording and streaming setup is to give you the flexibility to show whatever you want to show in that lesson with as little friction as possible.
During my time at Khan Academy, I found using a Wacom tablet worked quite nicely, and I've also done casual remote lessons over a video call where my "overhead camera" was just a phone sitting on a stack of books.
That said, being a "professional" YouTuber, and not wanting to disgrace my people, I thought I'd try to do it right. Well, okay, phrased more honestly my buddy Ben Eater was kind enough to lend a bunch of equipment and to patiently explain the numerous things I didn't know about live action filming.
Here's what we used:
- Two GH5 cameras, one rigged up on an overhead mount.
- Two USB to HDMI converter adapter cables, which essentially make the cameras operate like webcams.
- A set of studio lights
- A lav mic (More specifically a Rode Lavalier Lapel Omni-Directional Condenser Microphone)
- USB Audio Interface to take the feed from the mic to the computer (Focusrite Scarlett Solo)
- Two monitors. One to see the OBS dashboard, the other used for screen captures, managing the live quiz, seeing comments from the audience, etc.
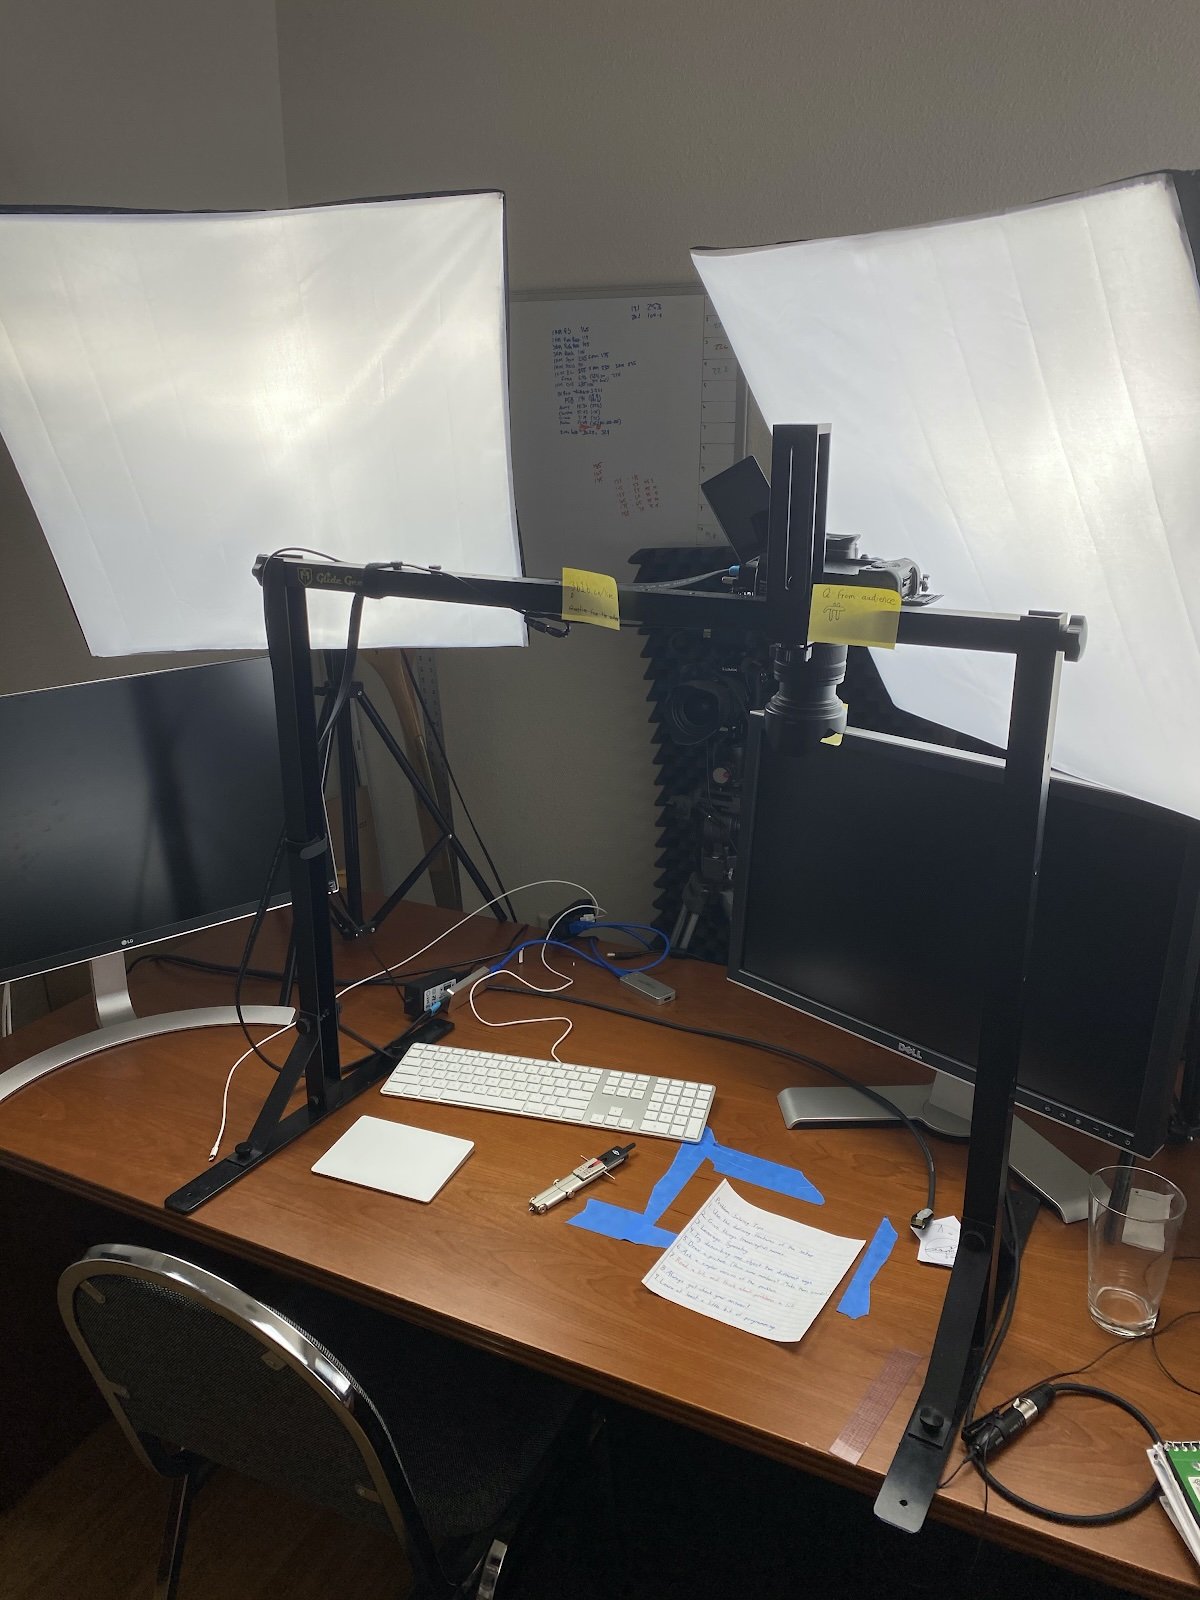
The masking tape on the desk was to know what region is inside the shot of the overhead cam, though even then I'd occasionally write off-screen. The sticky notes on the overhead camera rig let me know where to point in the air to reference links and things on the screen.
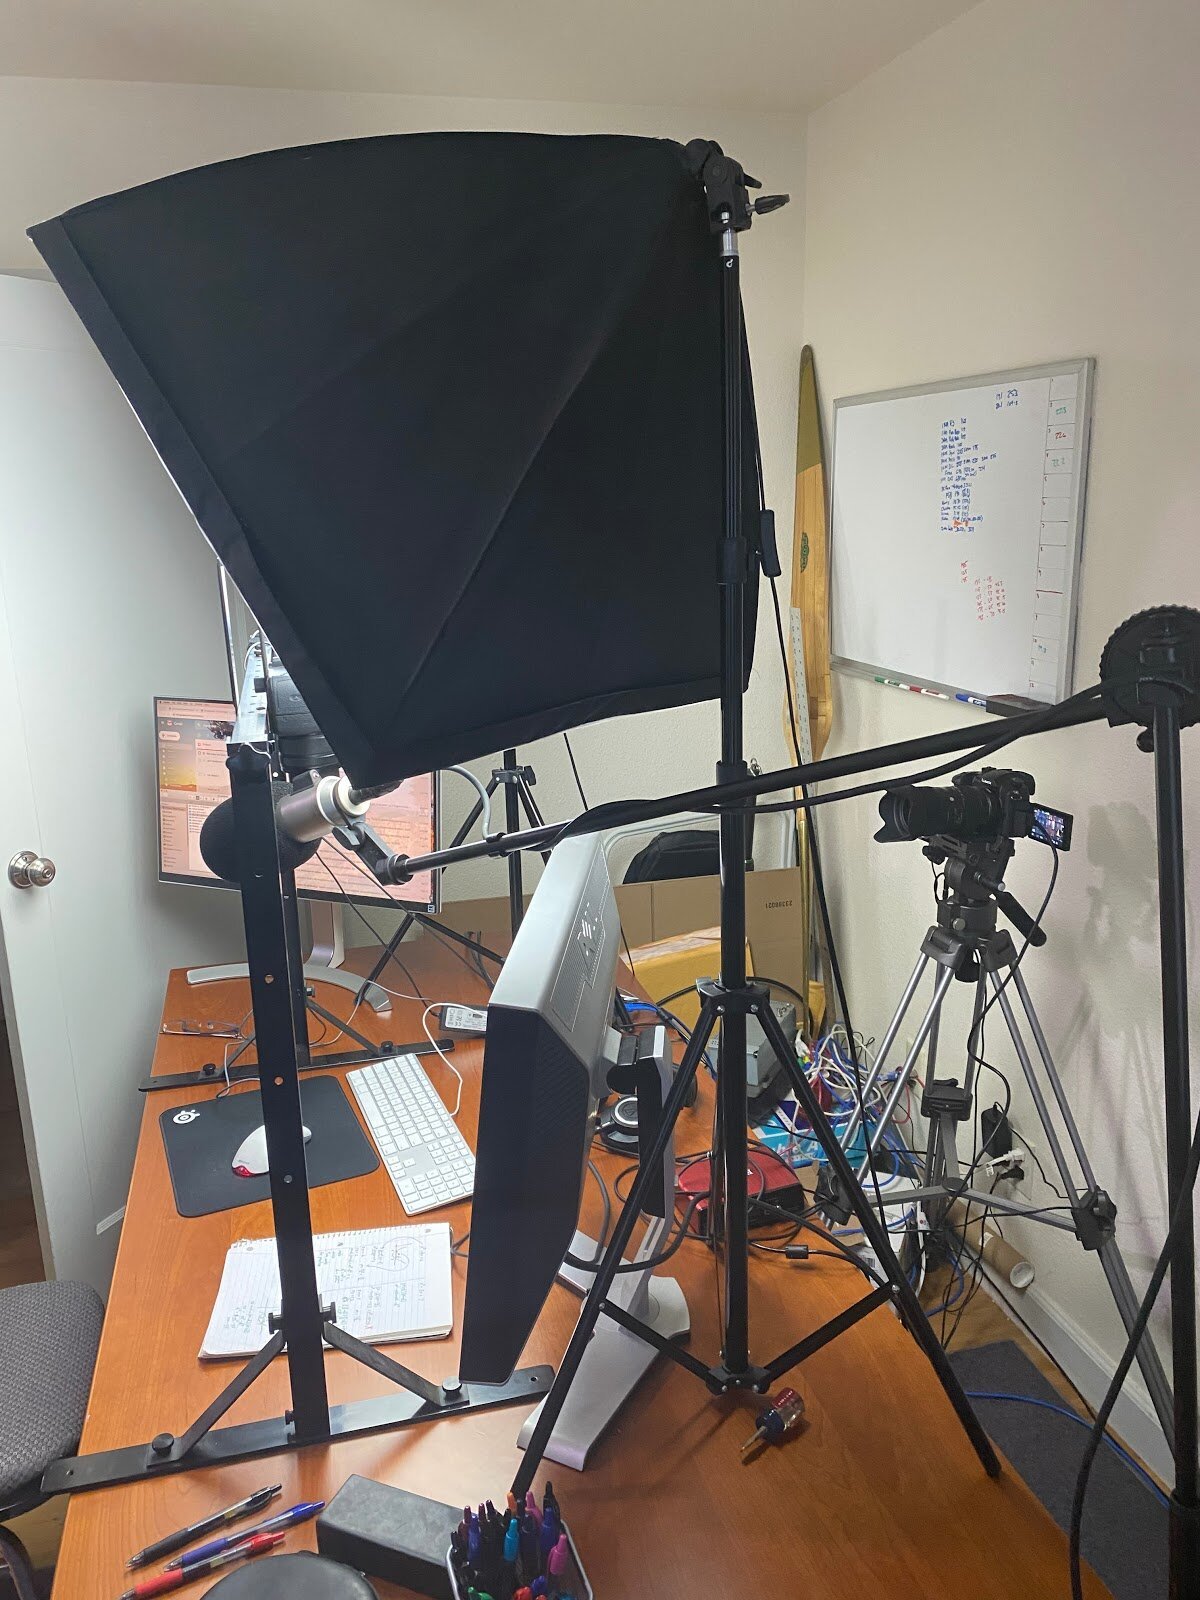
The microphone in this shot was just a backup in case the lav mic failed on us for some reason.
As a small technical note, for the first two streams we did, the audio was slightly out of sync with the video. Hooking up the microphone to feed through the same input source as the camera fixed this, but there are also options in OBS to force some kind of offset in the audio to account for any delays on the camera's end. Just do a simple test recording where you clap or something like that to see if the same issue comes up for you.
I would say, while for the most part being simple and barebones with the setup is fine, it's definitely worth having audio at a higher quality than what built-in computer or headphone microphones provide. I suspect part of the reason that video calls can be so much more exhausting than simply watching a video is that there's a constant, albeit slight, strain to make out what people are saying.
This advice comes from the category of "do what I say, not what I do". The earliest videos on my channel have terrible audio, and several of the early streams had some issue with the sound, whether it was being out of sync, being too quiet, or clipping. If you take the time to get it right early on, your students will be grateful.
Questions from the audience
The first stream we did had about 26,000 people watching, so the live chat was...not helpful. Actually, it was actively problematic given that people would just post the answers to the questions in there. To take questions from the audience in later streams, we switched instead to having people Tweet to a certain hashtag, which a buddy of mine then combed through to decide which ones were worth pulling up on the screen. The added barrier to contributing made it possible to comb through and the average thoughtfulness of each question was an order of magnitude higher.
Admittedly this part of the experience may not be as transferable for most teachers, but I do think there's something generalizable in this. In any classroom environment, whether big, small, remote, or in-person, you want engagement and contributions from the students, but only in the right direction. A class full of ambient chatter is in some sense engaged, but without guidance, it's unlikely to be in the direction of learning. Handling this remotely becomes a whole new ballgame, and it's worth finding whatever way works for you to connect with the good questions without there being a distracting onslaught of chatter. If you have someone, perhaps a TA, who can comb through questions and feed you the good ones, put them to good use.
As far as integrating this with the setup, what was easiest was to have a shared google doc, with one of the OBS scenes taking a webpage input that simply pointed to the URL of that doc. To give the question being overlaid on the camera shot, we made the Google doc background pure green and applied a chroma key filter.
Other tips
Rehearse!
Even for ordinary lectures, doing some kind of dry run always helps to make what's written in your notes come out as smoothly as you intend. But when you're using any kind of new technology, this goes triply.
Because I had set up the stream with these five different scenes, face, paper, screen capture, quiz, and audience question, running the lesson meant keeping each of these in mind. Which one am I on? Do I need to switch? And if I'm on the screen capture, what should be in the shot, the browser, an animation, or the terminal? Where are we in the live quiz right now? The goal should be for all of this to be second nature so as to stay most focussed on the lesson itself, and with a little practice, it can be.